This article contains the following sections:
I. Overview
This is the first page you encounter when accessing Fax Over Email through SiteControl and is the
starting point from which you can view incoming and outgoing faxes as well as send new faxes and
change fax settings.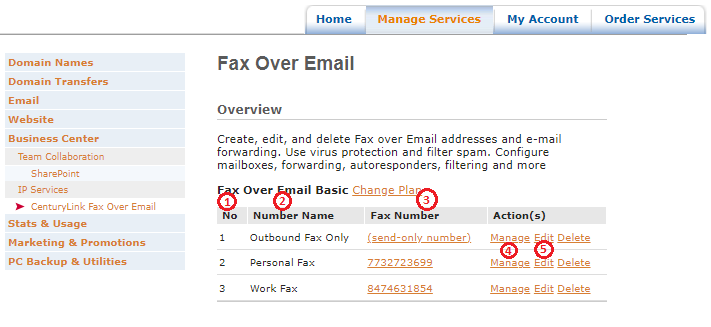
1. Each fax number is itemized. The number in the column simply means this is the first fax
number on the account.
2. The fax number name is used to distinguish between fax accounts. For example, you may
want to send a fax using your personal fax number versus a work fax number and the fax
number name is an easy way to know which is which.
3. Although you select the area code when placing the order for Fax Over Email, the actual fax
number is automatically as generated. This is the fax number you publicize to receive faxes
through SiteControl and/or email. Clicking the fax number takes you to the Home Page.
4. Clicking Manage takes you to the Home Page summary.
5. Clicking Edit lets you change the name of the fax number. The name is useful when you have
multiple fax numbers because it allows you to identify each line in a drop-down list on subsequent
pages.
II. Home Page
The home page is just an account activity summary displaying how many faxes have been received and sent. You cannot take any action on this page.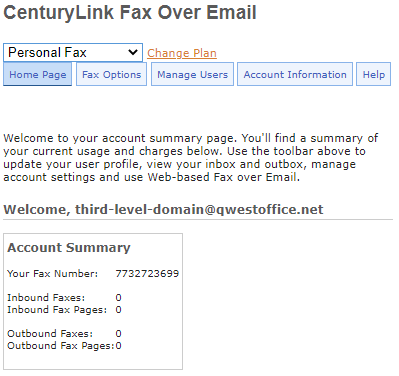
III. Fax Options
Clicking Fax Options displays a submenu. This settings submenu is where the majority of Fax Over
Email settings are found. After clicking Fax Options, My Fax Outbox automatically displays. The sections
that follow highlight each setting.
1. My Fax Inbox
Displays all received faxes along with some options for managing them.
Note: As long as the fax displays in My Fax Inbox, the status will always be SUCCESS. Otherwise, the fax will simply not display since it isn’t received.
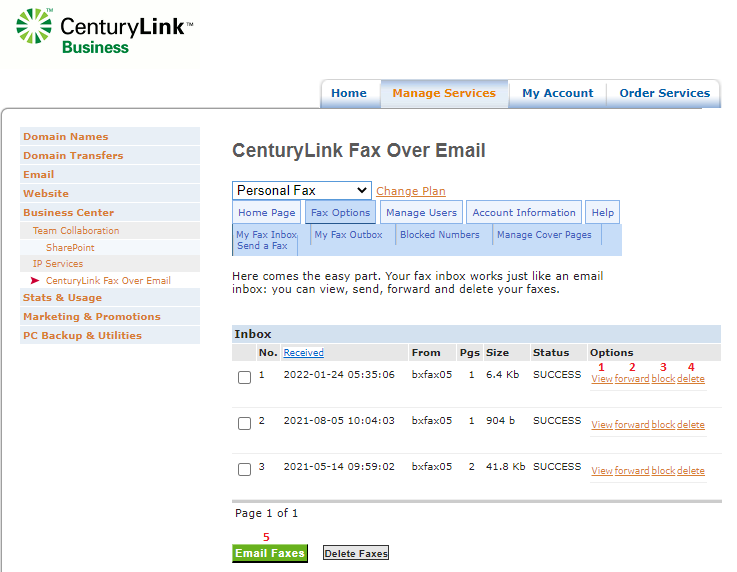
1. View. Opens a .tiff image of the fax in the same window. If the option is selected, all Fax
Over Email, users can receive the fax in an email with the fax pages as an attachment to the
email.
Note: The fax cover page is not displayed when viewing the fax.
2. Forward. Sends the original fax to a new fax number.
3. Block. Prevents Fax Over Email from receiving emails from fax number. Automatically adds
fax number to list of blocked numbers.
Note: There is no confirmation that the number is added to the block numbers list.
4. Delete. Completely removes the fax from displaying.
Note: There is no confirmation before deleting. Delete is immediate.
5. Email Faxes. Sends an email including the details of the fax such as Fax Received, From Fax
Number, and Number of Pages to all Fax Over Email users. The fax itself is attached as a
PDF.
2. My Fax Outbox
Identical to My Fax Inbox except that My Fax Outbox displays all the faxes sent through SiteControl.
Faxes sent by email are not displayed. Also, the primary user automatically receives a confirmation email
when a fax is sent through SiteControl.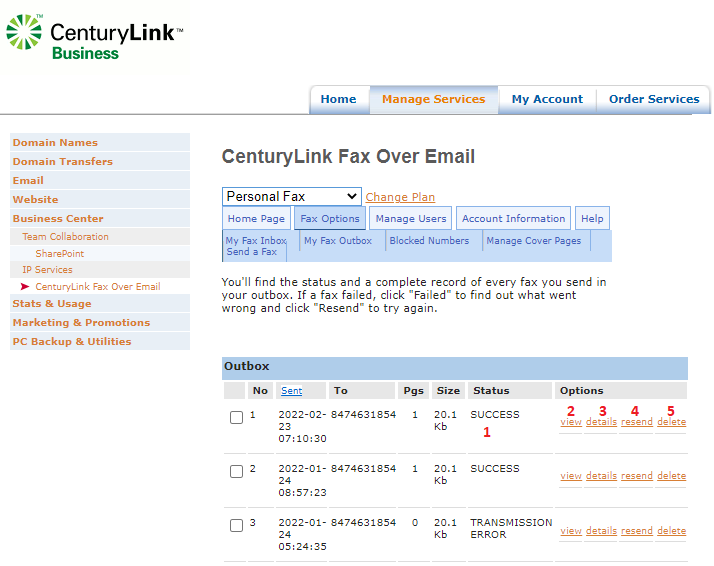
1. Status. The status of the outgoing fax. Outgoing faxes go through these statuses:
- Sched: The fax is scheduled to be sent.
- Queued: The fax is in line to be sent.
- IP: The fax is being transmitted.
- Success: The fax transmission was completed successfully.
When faxes are not successfully sent, you may see one of the following error statuses:
- Busy: The fax line dialed was busy.
- No Answer: The fax is in line to be sent.
- No Carrier: The fax line dialed answered, but did not provide fax carrier tone.
- Transmission Error: There was an error during the transmission of the fax.
- Bad Fax Format: The format of the supplied file is not supported by the fax server.
- Fail: This is an unspecified failure.
2. View. Opens a .tiff image of the fax in the same window.
3. Details. Opens a pop-up window of the same fax details displayed on the page, but also
includes how long the fax transmission took (i.e. Transit Time).
4. Resend. Unlike the Forward option in the My Fax Inbox, the Resend option here actually
resends the original fax to the original fax number without being able to modify it. This option
is generally useful if there was a sending error on a previous fax attempt.
When resending a previously sent fax, the details of the original fax are overwritten. For
example, the sent date and time, status, and transit time reflect the most recently resent fax.
Note: There is no confirmation before sending. Resending is immediate.
5. Delete. Completely removes the fax from displaying.
Note: There is no confirmation before deleting. Delete is immediate.
3. Blocked Numbers
As the name implies, this page lets you block receiving faxes from certain fax numbers by adding them
manually. However, you can also block fax numbers on the My Fax Inbox page. Any number blocked on
the My Fax Inbox page is automatically added here.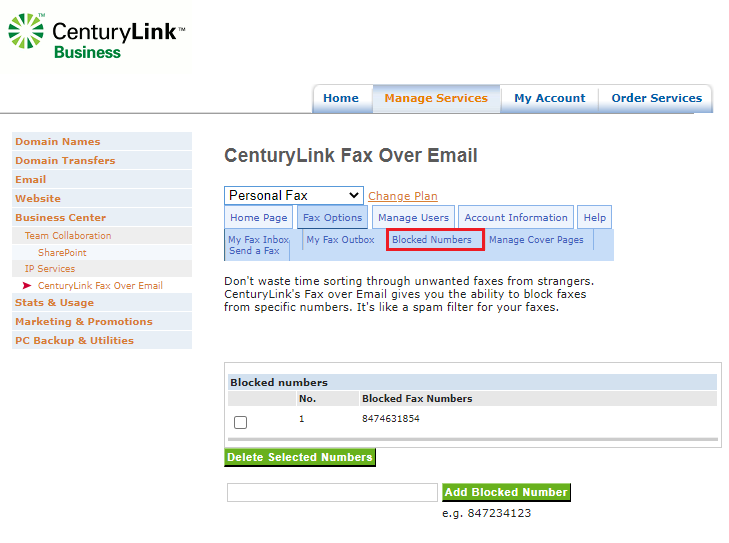
4. Manage Cover Pages
You may need to send faxes to different contacts, personal and business, so different cover pages for
each contact type make sense. Create three cover pages: personal, standard, and company. Keep in
mind that the cover page only adds a logo and header text. You cannot upload your own cover page.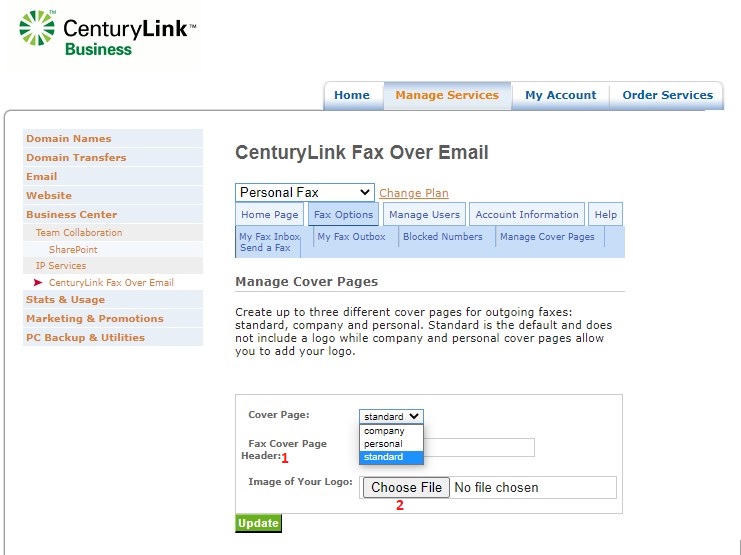
1. Any text exceeding 45 characters, including spaces, is automatically removed. Line breaks are also automatically removed.
2. Cannot update company and personal cover pages without selecting logo.
.png images are not supported.
5. Send a Fax
This is the page where you can send a fax through SiteControl. By default, after each fax is sent a confirmation email is sent to the primary user’s email address.
All fax pages are compiled into one PDF and attached to the confirmation email.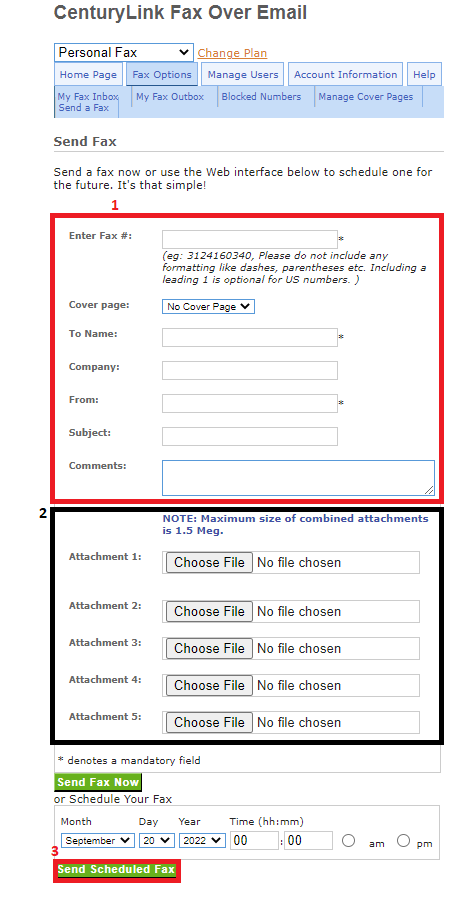
1. The To Name, Company, From, Subject and Comments fields appear on the fax cover page.
2. Add a .doc, .pdf, and/or .txt file. Multiple attachments are faxed in the order uploaded. MS
Word 2007 files or .docx files are not supported. In other words, attaching a .docx file returns
an on-page error message. You cannot send a fax without an attachment. An error message
will display prompting for an attachment. Cannot delete attachment once selected.
The attachments are uploaded only after clicking Send Fax Now or Send Scheduled Fax.
3. Send Scheduled Fax. Sets a future time and date for sending a fax. The My Fax Outbox
displays scheduled faxes with a SCHED status.
Note: A 12-hour CST time format should be used when scheduling fax.
6. Sending Fax Through Email
Sending a fax from an email client is a simple process. Compose an email as normal and attach the
document you want to fax. Just like when sending an email through SiteControl, a confirmation email is
sent to the primary user’s email address.
In order for this to work, the e-mail account you are sending from has to be added as a user in SiteControl first. It can be any e-mail account (3rd party ones would work), but with all plans, the number of these users is limited to 3 (1 primary and 2 additional users).
Note: Faxes sent through email are not displayed in My Fax Outbox in SiteControl. However, the total
outgoing fax count does include faxes sent through email on the Home Page and Account
Information pages.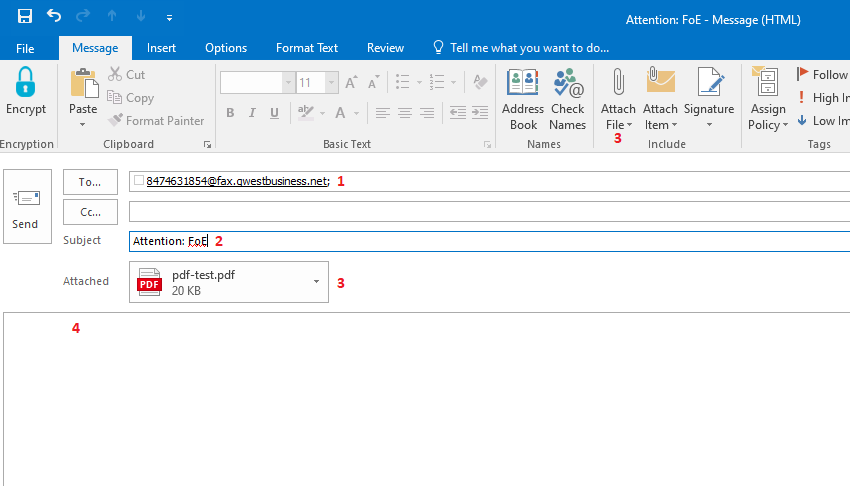
1. The To: field should have an email address in the following format:
[fax number]@fax.qwestbusiness.net. For example, 9543348010@fax.qwestbusiness.net.
Notice there are no dashes, periods, or spaces in the fax number.
Carbon copying (Cc) or Blind carbon copying (Bcc) another fax number will not work. You’ll
receive an email almost immediately indicating that sending the fax failed.
2. The subject line of the email displays as the Re: field on the fax cover page.
3. Although the maximum file size is essentially 5MB (5 attachments at 1MB each) for sending
fax through SiteControl, the maximum file size for fax is 10MB when sending through an email
client.
4. The body of the email is not added to the comments section on the fax cover page.
Note: We strongly encourage the use of PDF or TIFF formats. Microsoft Word (97-2003), GIF, RTF, JPEG, BMP, TXT, HTML and PS files are also compatible. (Note: The conversion for Word documents is not always perfect, and, as a result, the faxed file may not appear exactly as sent. Additionally, Word 2007 users should convert the document to Word 2003 format, or, preferably to PDF.
IV. Manage Users
Up to three users can send (through email) and receive faxes: one primary user and two additional
users.
1. The format used for incoming faxes when they are emailed to users. For example, when
receiving an incoming fax an email is sent to the user with the incoming fax as an email
attachment. The format selected here determines the format of the attachment.
2. Enable/disable the option to receive an email with a copy of incoming and outgoing faxes.
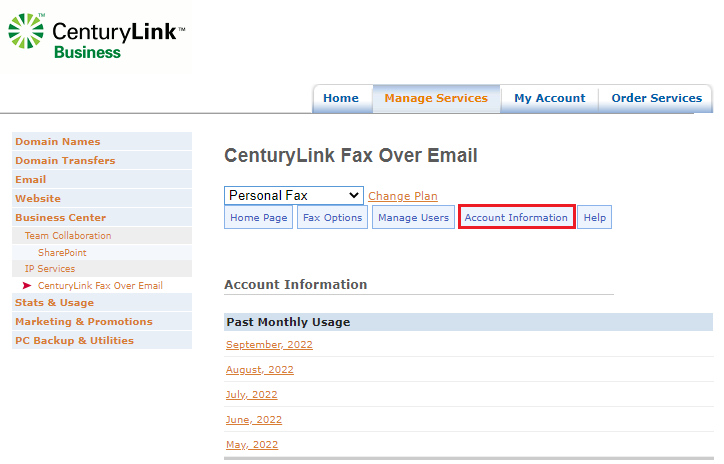
V. Account Information
This page simply shows a monthly usage history of total incoming and outgoing faxes.